Making Molds with 3d Printers: Injection Molding
If you’re a designer doing rapid prototyping, you want each iteration to reflect as close to the final product as you can get. Sometimes the standard materials 3d printers can print are not enough. If you’re designing for silicone, you want to see how the final product will bend and flex. With a few steps more than a standard 3d print, you can turn your 3d print into silicone.
Step One: Design
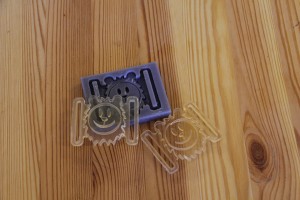
Design your object using your standard 3d software. For injection molds, it’s better to not have large solid pieces, since they can waste your silicone. The design must be completely connected, so the silicone can fill the entire piece through one entrance point. Silicone tends to work better when the design has a bevel to it, and try to avoid sharp points. You probably don’t want any wall to be less than about 0.3 cm since the silicone can have a hard time filling small shapes.
Once you have your positive design ready, you need to convert that to a negative mold. If your object is correctly put together and watertight, you can just do a boolean subtraction with a solid rectangle for each side. Using Solidworks or another solid-based modeling program will help. Sometimes booleans with even simple 3d models are difficult using maya or blender. Remember to add an injection site by subtracting out a cone and cylinder, and key pieces by adding cylinders on one side and subtracting them from another.
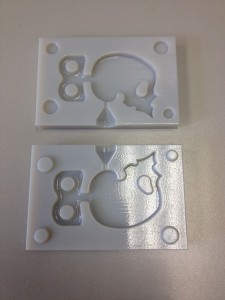
If your design has overhangs in the mold direction – if you’re molding a cup, for example, it’s usually better to print as three pieces, one for the inside negative surface, and one for each of the outside surfaces. Sanding down the surface will make your final product much cleaner, and you need to be able to reach those inside surfaces.

Step Two: Printing
Print at the highest resolution you can. Any striations that are visible on the surface of your print from the print levels will be transferred to your mold. Once the print is done, you can sand the surface with fine grit sandpaper to give a uniform surface to print. If you want an even smoother surface, you can polish a bit of wax onto the surfaces to fill any layer pitting.
Step Three: Injection
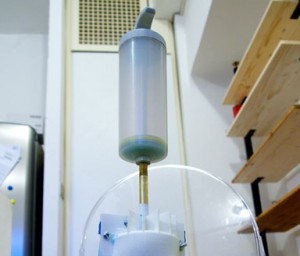
Use a spray silicone releaser to lightly coat the surfaces of your model. This will also help the final polish quality. Align all pieces of your mold using the keys, and clamp them together solidly. If you inject too much silicone, it can bleed into any voids left if the mold parts aren’t completely flush. In the worst case, your mold parts can detach and spill the silicone over your work surface. C clamps or binder clips work well, and we’ve seen people screw their molds together.
Warm your silicone to the temperature the directions say. With a syringe, slowly but steadily inject silicone into the mold. Depending on your model size, this can take quite a bit of pressure to fill completely. When the silicone just starts giving backflow is when to stop, but if you’re not paying attention, stop pressure when it begins to leak out.
Step Four: Curing and Cleanup
Hardening takes about an hour for room temperature silicone, and some silicone needs to be cured in an oven. Read the directions on your silicone to know the right time for the silicone to harden. If done correctly, you should only need to trim off the edges and the funnel area used to inject. The same molding techniques can be used with an open top if your object has a flat base. We’ve seen 3d printed then molded water bottles, keychains, medical devices, and even molded chocolate.